How to Use Pen Tool in CorelDraw: Advanced Techniques
How to use Pen Tool in CorelDraw to draw advanced graphics. You are only limited by your imagination. Master the CorelDraw Pen Tool and design like a pro.
Whether crafting logos, illustrations, or layouts, mastering the CorelDraw Pen Tool profoundly elevates both productivity and creative expression. This guide aims to unveil diverse techniques facilitating the efficient use of the Pen Tool in CorelDraw to create and edit shapes in CorelDRAW.
This tutorial is lesson 2 of my CorelDRAW Pen Tool series. For a solid grasp of the CorelDRAW Pen Tool, I recommend delving into my beginner-oriented introductory article: Pen Tool in CorelDraw.
Getting Started
How to Use Pen Tool in CorelDraw
This tutorial uncovers various techniques for efficiently using the Pen Tool in CorelDraw to create and edit shapes in CorelDRAW. Mastering the Pen Tool greatly enhances productivity and creative expression when designing logos, illustrations, and layouts.
How to Draw Heart in CorelDraw with Pen Tool
The heart, universally recognized as a symbol of love and emotion, embodies profound sentiment and is a timeless motif in art and design.
Unlock the art of drawing a heart shape with precision and finesse using the CorelDRAW Pen Tool this year to tell your love story.
Also Read: How to Draw a Shiny Heart in CorelDraw.
Let’s start.
1. Open CorelDRAW and create a “New Document.”
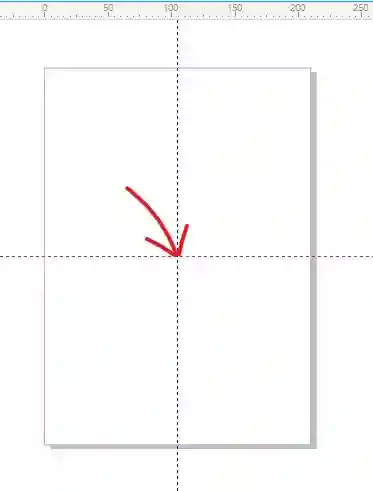
2. Drag the horizontal and vertical guidelines to the “Drawing Page” and press “P” on the keyboard to center them.
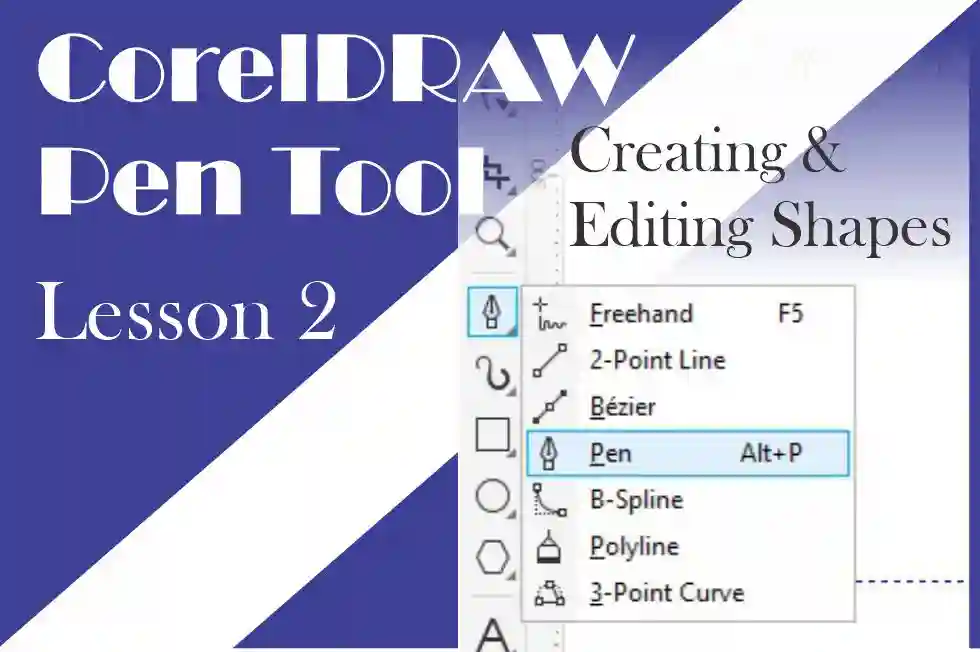
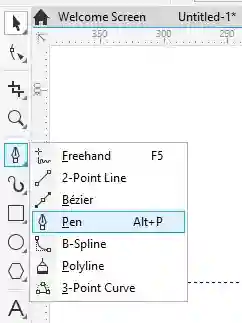
3. Select the “Pen Tool” from the toolbox or press “Alt+P” on the keyboard.
CorelDraw has not assigned a shortcut key to the Pen tool so we have to create our key. If you want to learn how to create a shortcut key, I have dedicated an article to how to create shortcut keys in CorelDraw.
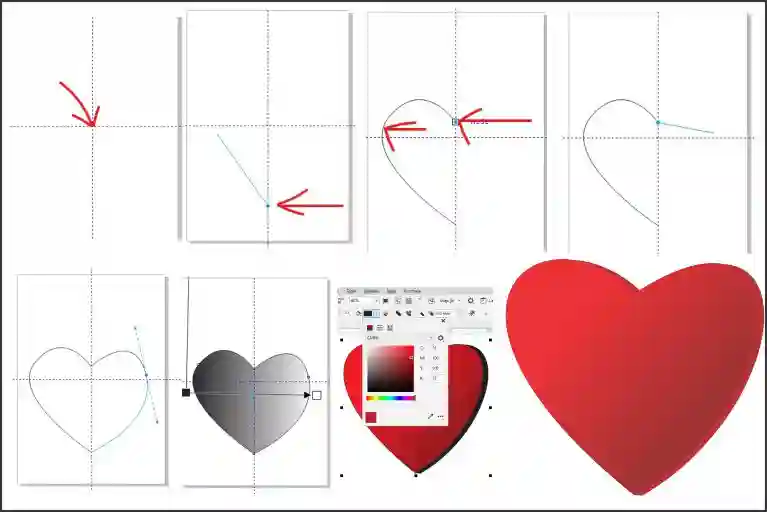
4. Click on the “Drawing Page” to create the starting point (start node) of the heart.
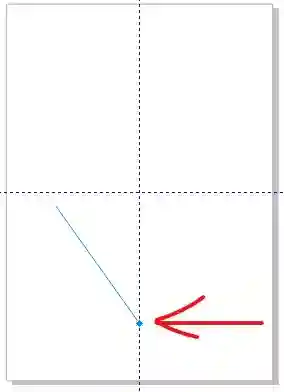
5. Click and drag to create the first curve representing the left part of the heart. Release your finger from the mouse button and click again.
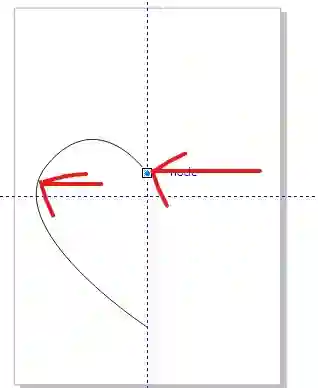
6. Move the mouse downward as shown in the picture below.
7. Click and drag while holding down the mouse button to create the right curve of the heart.
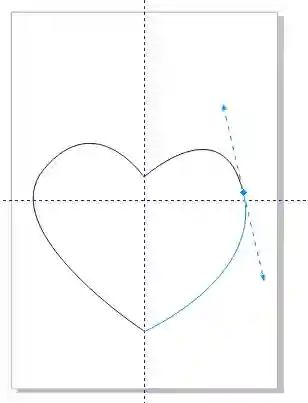
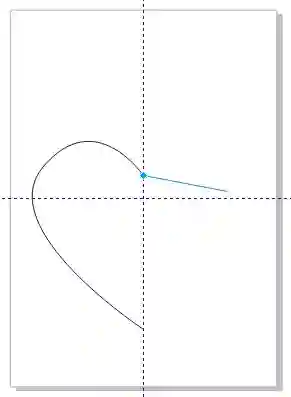
8. Finally, connect the curves by clicking on the starting point to close the shape.
Using the Fill Tool in CorelDraw
Now our heart is complete. Let’s add color to make it look nice.
8. Select the “Interactive Fill” tool in the “Toolbox” or press (G).
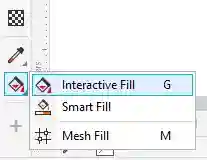
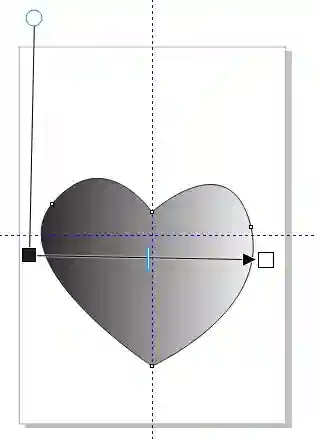
9. Drag the “Interactive Fill” tool over the heart.
You will notice the shape is filled with dark gray color. But that’s not the color we want will change it in a minute.
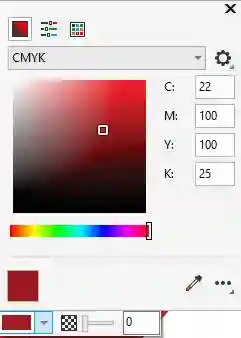
10. Click the right “Node color” box to drop down the color menu and input the following numbers in their respective fields: C: 22 Y: 100 M: 100 K: 25.
See the picture below.
11. Click the left “Node color” to drop down the color menu and input the following numbers in their respective fields: C: 0 Y: 100 M: 100 K: 0.
See the picture below.
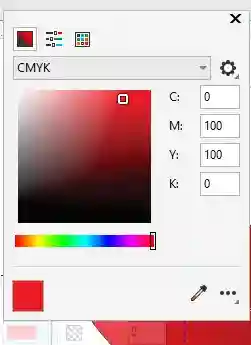
We are using the CYMK color model.
This is our shape after applying the colors using the Interactive Fill tool.
You can remove the “Guidelines” by clicking them and pressing the “Delete” key on the keyboard.

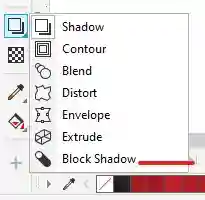
Using the Block Shadow Tool in CorelDraw
12. Click “Block Shadow” from the “Shadow” drop-down menu and drag it over the shape.
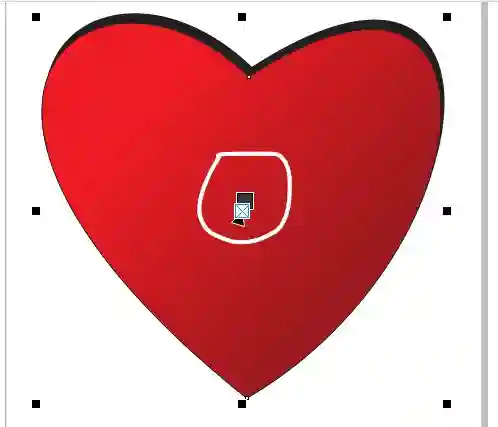
13. Grab the handle as shown in the picture above and move it to the right to form a 3D shape.
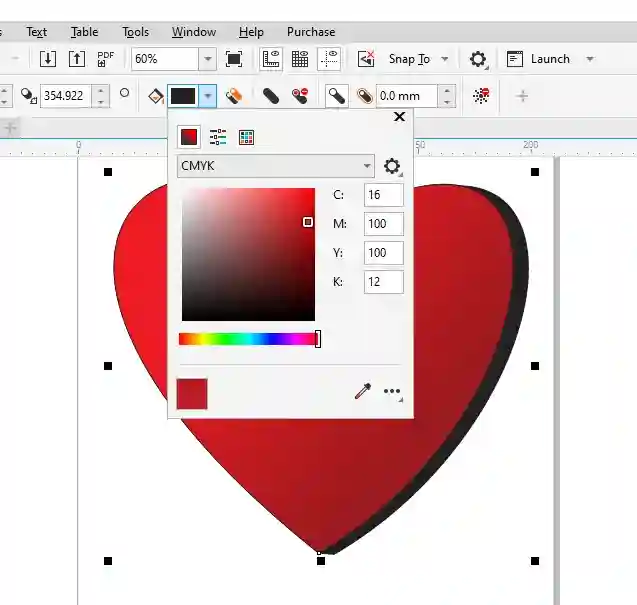
14. Click on the handle of the “Block Shadow” tool and change the color. Input the following numbers: C: 16, M: 100, Y: 100, K: 12
17. Select the “Pick” tool and click the shape. After clicking the shape remove the outline color by right-clicking the outline color “None” in the color “Palette.”

This is the final result of our heart after applying the “Block Shadow Color.”

How to Create Shortcut Keys in CorelDraw

Shortcuts help us work faster as designers. In CorelDraw, if I decide to align an object to the center of the drawing page, instead of doing that manually I could select the object and press the “P” key to center align the image.
This not only speeds up productivity but also helps in achieving accuracy in our projects.
The shortcut key for center alignment in CorelDraw is “P.” If you press Ctrl+E it will open the “Export” file explorer.
Many tools were assigned a shortcut key in CorelDraw but the Pen Tool including some other tools were not assigned a shortcut key in CorelDraw.
To call these tools by shortcut key, CorelDraw provides a means to assign a shortcut key manually. Always make sure your key makes sense so that you can remember it.
How to Create Shortcut Key for Pen Tool in CorelDraw
The shortcut key for the pen tool in CorelDraw is Alt+P. This is a key you should manually assign in the “Shortcut Keys” tab.
Let’s assign a key to the “Pen Tool” so we can always call it to action using our shortcut key. Since the “P” key is assigned to center alignment, we cannot use it.
That said, we can work around it by appending it to another key.
Let’s create a shortcut key for the pen tool.
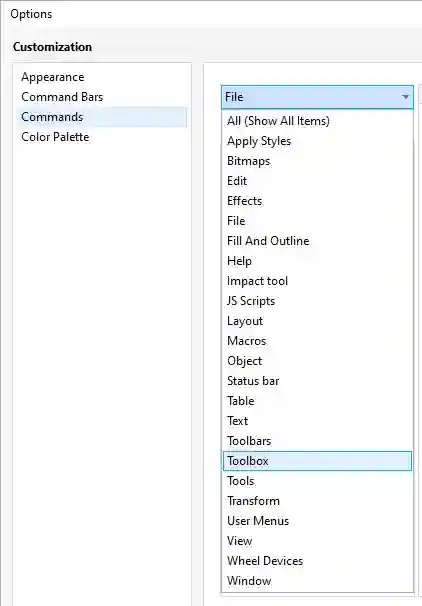
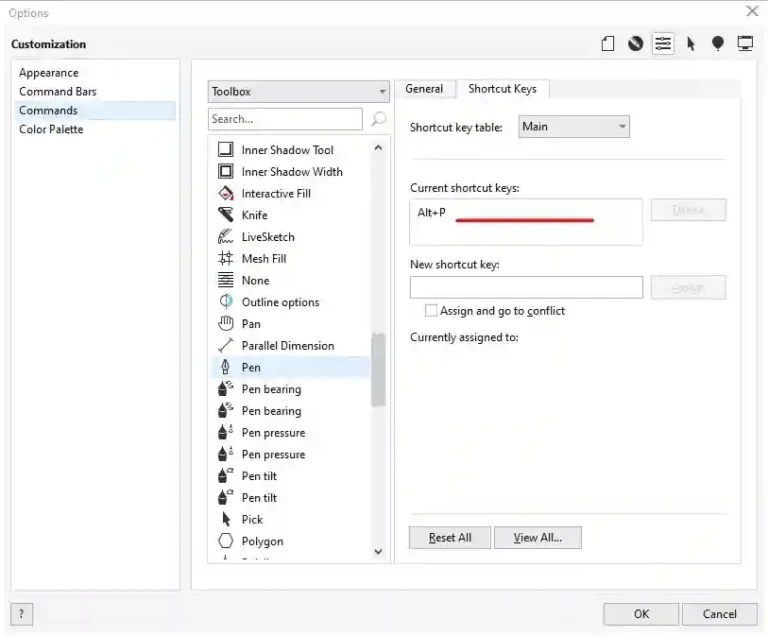
1. Launch your CorelDraw and click the “Tools” menu on the menu bar.
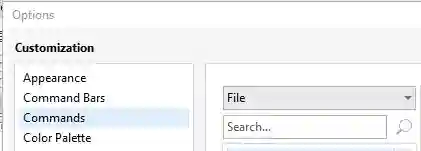
2. Move the mouse to “Options” then click “Customization.”

3. Click the “Commands” tab in the new window.
4. Click the drop-down menu and select “Toolbox.”
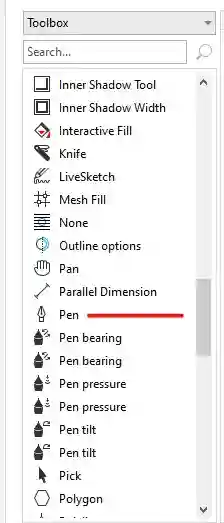
5. Select “Pen” in the “Toolbox” menu.
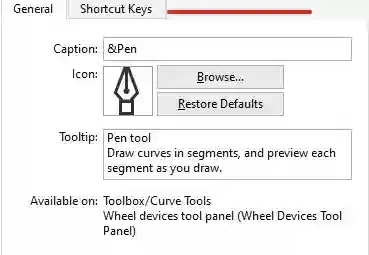
6. Click the “Shortcut Keys” tab.
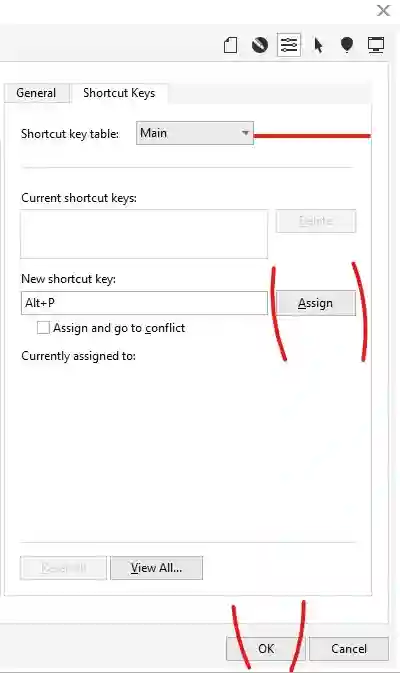
Before we assign our keys, you can try typing different keys in the “New shortcut key” field to check if the key is already assigned or available.
Try inputting “P,” CorelDraw will let you know that this key is assigned and it will give you its assignment.

If this is not the case, CorelDraw will not return any value.
Let’s continue.
7. Input “Alt+P” in the “New shortcut key” field, and click the “Assign” button.
Leave the “Shortcut key table” to the default “Main” table.
Now you have assigned your “Pen” tool a shortcut key.
The “Current shortcut keys” field will be populated with our new value.
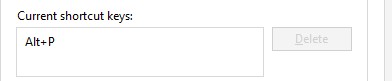
8. Click “OK” to apply the new shortcut key.
If you remember, I told you earlier that the “P” key is assigned but I have an alternative. The alternative is the “Alt+P” key. This type of value is allowed in CorelDraw except the key is already taken.
So, whenever you want to use a key and it is assigned, append the key to any of these commands Shift/Ctrl/Alt if you are on Windows.
Note that, CorelDraw has assigned some of the tools using the above commands.
Tips for Efficient Editing
- Grouping Objects: Group related shapes together to simplify editing. Use Ctrl + G to group selected objects, making it easier to move, resize, or apply transformations collectively.
- Using Guides and Grids: Enable snap-to-grid and snap-to-object options to align shapes precisely. Utilize guidelines to maintain consistency and alignment across your designs.
- Undo and Redo: Don’t hesitate to experiment with different editing techniques. CorelDRAW’s Undo (Ctrl + Z) and Redo (Ctrl + Y) commands allow you to revert changes or revisit previous states.


For the past few days I’ve been frequently checking out this amazing website, they have sensational content for subscribers. The site owner has a real talent for engaging readers. I’m impressed and hope they maintain their wonderful efforts!
Thank you Janet.
Although I believe every thought you have for your post is excellent and will undoubtedly be successful, the postings are too brief for new readers. Maybe you could extend them a little bit the next time? I’m grateful for the post.