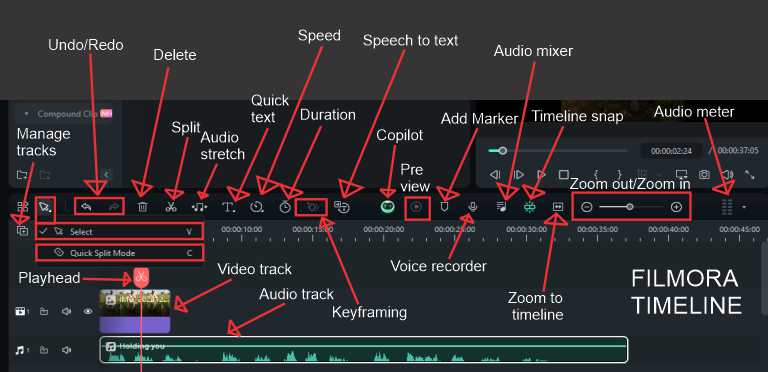
Wondershare Filmora Timeline: The Basic Functions
The distinction between a degree holder and a talented individual lies in their familiarity with technical terms. While the degree holder is well-acquainted with the terminology, the talented person excels in manipulating functions without necessarily knowing the names of the tools. To bridge this gap, it is crucial to enhance your proficiency by familiarizing yourself with the names of the most commonly used tools in the Filmora timeline.
The timeline in Wondershare Filmora is the central hub where users arrange and edit their video clips, audio files, and other elements to create a seamless and visually appealing final product. The timeline interface is designed with simplicity in mind, making it accessible for users with varying levels of experience in video editing.
Also Read: Video Timeline: The Right Way to Use It
Key Features of the Filmora Timeline
1. Drag-and-Drop Functionality
The timeline in Filmora employs a user-friendly drag-and-drop interface, allowing users to effortlessly add media files, transitions, and effects to their projects.
This feature eliminates the steep learning curve associated with some video editing software, making it easy for beginners to get started quickly.
2. Multiple Tracks
Filmora’s timeline supports multiple video and audio tracks, enabling users to overlay different elements and create complex compositions.
This feature is particularly beneficial for those looking to incorporate B-roll footage, music tracks, voiceovers, and more into their projects.
3. Precise Editing
The timeline provides precise control over the timing and duration of each element in the video. Users can easily trim, split, and adjust the length of clips with accuracy, ensuring a polished and professional-looking result.
4. Keyframing
For more advanced users, Wondershare Filmora’s timeline offers keyframing capabilities. This allows for dynamic changes in properties such as position, scale, and opacity over time.
Keyframing adds a layer of sophistication to video projects, enabling creative and visually stunning effects.
5. Audio Editing
The timeline isn’t just for visual elements; it’s also a powerful tool for audio editing.
Users can precisely control the timing of background music, voiceovers, and sound effects, ensuring a harmonious blend of audio and visual components.
6. Transitions and Effects
Filmora’s extensive library of transitions and effects can be seamlessly integrated into the timeline.
Users can apply transitions between clips, add filters, and enhance their videos with a variety of creative effects to make their content stand out.
7. Text and Titles
Users can add text and titles to their videos directly on the timeline.
Filmora offers a range of customizable text options, including fonts, colors, and animations, allowing for creative and dynamic text elements in the video.
8. Export Options
Once the editing process is complete, the timeline makes it easy for users to export their projects in various formats, including popular video file types and social media-friendly formats.
The Basic Functions of Filmora Timeline
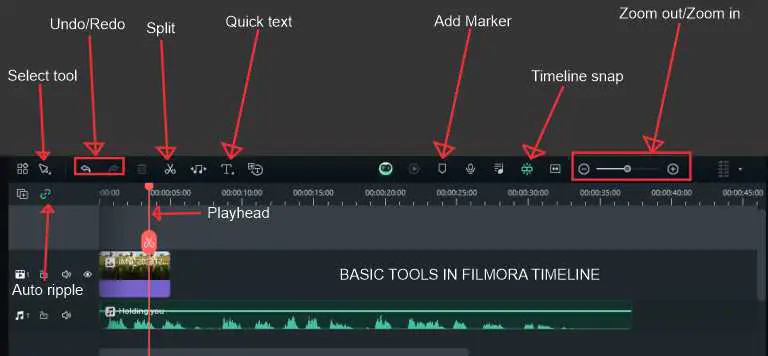
In Wondershare Filmora, the playhead, split tool, and other editing features play crucial roles in fine-tuning and refining the content on the timeline.
Let’s explore these elements.
1. Selection Tool
The selection tool is a basic tool for moving, selecting, and adjusting clips on the timeline. It allows users to click and drag to move entire clips or select specific portions for editing.
Users can easily move clips around on the timeline, adjust their durations, or apply various edits using the selection tool.
2. Playhead
The playhead is a movable indicator on the timeline that marks the current position during playback. It helps users preview their projects in real-time and locate specific points for editing.
By dragging the playhead along the timeline, users can quickly navigate to different sections of their projects to review and make adjustments.
An orange vertical line with a clickable marker that runs through your timeline.
3. Split tool
The split tool, often represented by a small scissors icon, is used for cutting or splitting clips on the timeline. This tool is essential for precise editing, allowing users to trim or separate portions of a video or audio track.
Users can position the playhead at the desired point on the timeline and then use the split tool to cut.
This functionality is particularly useful for removing unwanted sections or creating seamless transitions between clips.
4. Zoom In/Out
The zoom in and zoom out controls help users adjust the level of detail on the timeline. Zooming in allows for precise editing at a smaller time scale, while zooming out provides an overview of the entire project.
This feature is valuable when working on intricate edits or when dealing with longer projects where a broader perspective is needed.
5. Time snap
Timeline snap is a feature that automatically aligns clips and elements on the timeline. When enabled, it ensures that clips snap to specific points on the timeline, such as the beginning or end of other clips.
This feature aids in maintaining a clean and organized timeline, ensuring that elements align seamlessly without any gaps or overlaps.
6. Markers
Markers are points that users can place on the timeline to indicate specific positions or reference points. They are useful for marking key moments, making notes, or coordinating edits with collaborators.
Markers help users stay organized and facilitate communication when working on complex projects.
7. Undo/Redo
The undo and redo functions are essential for correcting mistakes or experimenting with different editing approaches. Users can easily navigate through their editing history and revert changes if needed.
Understanding and effectively utilizing these tools in conjunction with the playhead enhances the overall editing experience in Wondershare Filmora, providing users with the precision and control needed to create polished and professional videos.
8. Auto Ripple
Auto ripple effect transforms the edited video by eliminating the gaps and applying smooth transitions to merge the different video clips. Read more about the ripple effect here.
9. Quick Text
Quickly add text over the top of your footage by selecting the quick text tool and clicking inside the quick text window displayed on the right side of the software to edit the default text.
Conclusion
These basic functions make the Wondershare Filmora timeline a versatile and accessible tool for video editing, suitable for both beginners and more advanced users seeking a straightforward yet feature-rich editing experience.


How long have you been blogging? Your blog design is amazing. You make it look so easy. Your website looks great overall, and the content is great as well.
I appreciate it.
Wow superb blog layout How long have you been blogging for you make blogging look easy The overall look of your site is magnificent as well as the content
Great information shared.. really enjoyed reading this post thank you author for sharing this post .. appreciated
Thanks