Mastering Filmora Performance: Troubleshooting Lag and Rendering Issues
Facing crashes can be frustrating, especially when confronted with a looming deadline. Mastering Filmora performance will help you manage Filmora and other video editing applications efficiently like a professional video editor.

Mastering Filmora performance: is a must for video editors. In this guide, I explored tips for troubleshooting common performance issues and optimizing Filmora’s performance to avoid crashes and ensure efficiency. Video editors not using Filmora will find this guide useful for addressing performance issues related to lag and rendering.
Troubleshooting Lag and Rendering Issues
If you have always used a supercomputer you wouldn’t understand the importance of this topic since you have always been on top of issues regarding speed.
Unless that is your case, you are aware of exactly what it is to click a command and wait a thousand years to receive a response from your application.
Not ending there, your application is likely to crash because you send too many commands at the same time as the initial command failed.
Troubleshooting Lag and rendering issues is a topic you need to pay close attention to if you want to enjoy your computer and your applications.
As a video editor, facing the trouble described above will not help you meet your deadline, nor will you be able to produce quality video.
I’ve been through this many times so, I know how it feels and I have tried different solutions to fix this problem.
Let’s look at them.
1. Computer Should Meet System Requirements
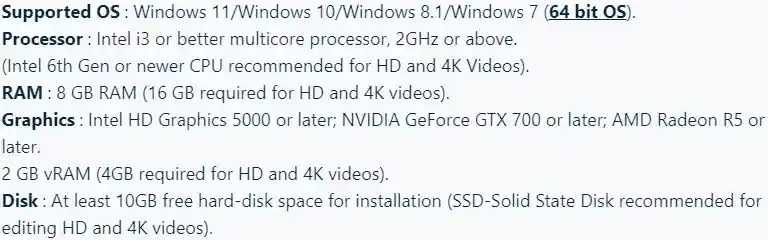
Software developers, acknowledging these challenges, furnish users with guidelines specifying the necessary versions of the system software and hardware required to seamlessly operate their software.
You should read this note before buying any software including Wondershare Filmora.
Here are the tech specifications for Wondershare Filmora.
Ensure that your computer meets or exceeds the recommended system requirements for running Filmora. This includes considerations for processor speed, RAM, graphics card, and available storage.
In this article speed up video editing, I looked at what to do to meet the requirements for video editing software. You should read this article when considering professional video editing.
2. Look at the Project Complexity
The complexity of your video project, including the number of tracks, effects, and clips, can impact performance. High-resolution videos or intricate edits may require more processing power.
When this is the case, you may want to separate the scenes among multiple projects and later join the outputs for the final export.
So, before you start importing media files, take into account the complexity of your video project.
3. Pay Attention to Background Processes
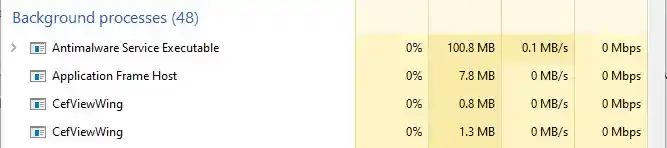
Check for other resource-intensive applications running in the background. Close unnecessary programs to free up system resources for Filmora.
Some computer users are fond of launching multiple applications at the same time even if they are not in use. This can cause an application’s failure to respond to inputs on time.
In addition, do not install programs you do not need. Reserve your work computer for only essential tools to reduce the workload.
4. Update Outdated Drivers
Ensure that your graphics card drivers are up to date. Outdated drivers can lead to compatibility issues and affect the performance of video editing software.
5. Create a Proxy File
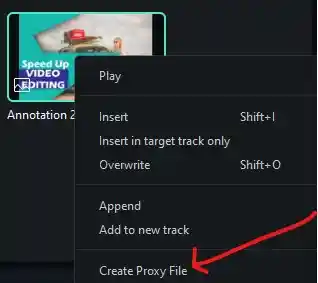
Enable proxy editing in Filmora to create lower-resolution versions of your media for editing. This reduces the strain on your system, especially when working with high-resolution footage.
The first time I put the Filmora proxy to the test, I was amazed at the result. Enabling a proxy proved to be a game-changer for this sluggish system.
Filmora had a history of frequent crashes on this setup, but with the proxy activated, I experienced seamless functionality with various file types.
To create a proxy file, right-click the clip and click “Create Proxy File” in the menu. After creating the proxy file, you will notice a sign at the left bottom of the clip with a “P.”

Congrats, you have just created a proxy file.
Enabling Filmora Automatic Proxy

1. Go to the “File” menu and select “Preferences.”
2. Click the “Performance” tab.
3. Locate “Proxy” and check the box for “Automatically create proxies when media resolution is higher than:”
4. Set your preferred video and image resolutions.
Leave these default settings. In my case, they are enough.
6. Preview Quality Settings
Adjust the preview quality settings in Filmora. Lowering the preview quality can improve real-time playback performance while editing.
To address any sound delay associated with your video clip, adjusting the preview quality settings can resolve this performance issue.
7. Use the Render Preview
Render parts of your timeline for smoother playback. Use the “Render Preview” option to generate temporary preview files for the selected portions of your project.
8. Export Settings
Optimize export settings based on your project requirements. Choosing the right format, resolution, and bitrate ensures efficient rendering without compromising quality.
9. Utilize Hardware Acceleration
Utilize hardware acceleration if your system supports it. This offloads some processing tasks to your graphics card, enhancing rendering speed.
10. Clear Cache Files
Clearing temporary cache files can free up storage and potentially improve rendering speed.
11. Use SSD for Storage
If possible, use a solid-state drive (SSD) for storing your media files and the software. SSDs offer faster read and write speeds compared to traditional hard drives.
Besides using solid-state drives, you should get a drive with a bigger size that will accommodate more files and also have enough free space.
You can buy solid-state drives on Amazon or the computer shop in your city.
12. Optimize Timeline Structure
Streamline your timeline structure by minimizing unnecessary tracks and effects. This simplifies the editing process and can improve overall performance.
Don’t drag and drop all the files at the same time to your timeline. Load the timeline with the files as needed for your video. Remove any clip or effect you don’t need.
You can always bring them back when you have use for them.
13. Increase RAM Allocation
Random access memory allows the computer to temporarily store and access data immediately. Opting for insufficient memory will result in sluggish performance, especially during multitasking.
If your system has ample RAM, consider increasing the allocated RAM for Filmora in the “preferences”.
This can enhance the software’s ability to handle larger projects.
You can buy RAM on Amazon or any computer shop in your city.
14. Monitor Resource Usage
Use system monitoring tools to track resource usage while editing. Identify any spikes in CPU or memory usage that could be causing performance issues.
You could monitor any software’s performance. In this example, we are looking at Google Chrome.
In Windows 10 you can monitor a program’s resource usage using the task manager. The task manager provides detailed insights into your computer’s performance and resource usage.
Using the Task Manager to Spy on Your System’s Performance
1. Pressing Ctrl+Shift+Esc to open the “Task Manager”.
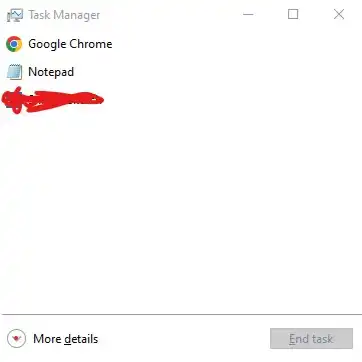
3. After launching the “Task Manager” click on “More details” to expand the task manager.
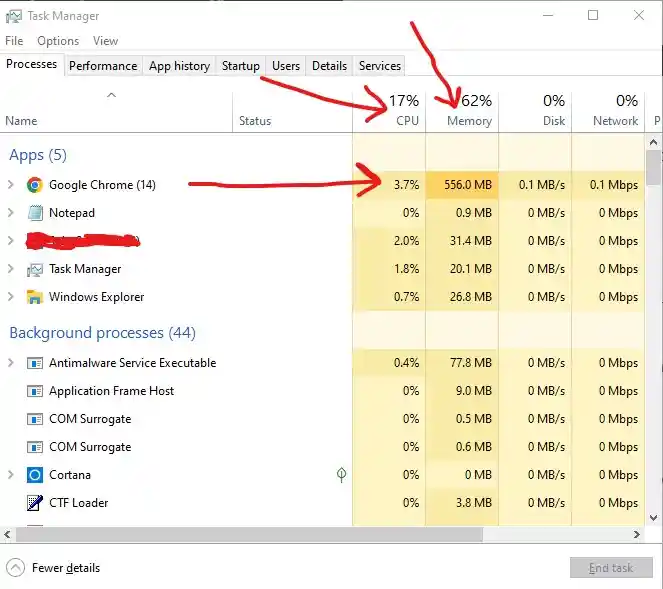
On the right side of the window, you will see the “CPU” and “Memory” usage statistics and other statistics.
4. You can also click on the “Performance” tab to access full details.

Read more about the task manager in this article that I found on Google.
Recovering and Preventing Filmora Crashes
I am yet to know of anyone who enjoys a software crash. Speed and accuracy are long-standing values for all video editors. This is the reason editors pick the best video editing software not only based on stuffed functionality but speed as well.
Every video editor will experience a software crash once in a while no matter how good their hardware or application is. That is why Wondershare Filmora provides tools and features to help you navigate through and recover your project in the event of a crash or returning from a power outage.
In this guide, we’ll explore how to handle software crashes, recover your work, and implement proactive measures to enhance the stability of Filmora.
Also Read: Speed Up Video Editing with 15 Open Secrets
Recovering from a Crash
Dealing with software crashes can be a daunting experience, especially when working on a creative project. What is more annoying is losing your file after the crash.
Here are some of the great features Filmora has in place to help you navigate Filmora.
1. Automatic Recovery
Today, most software developers implement an auto recovery functionality into their software to save users time when there’s a software crash or power outage.
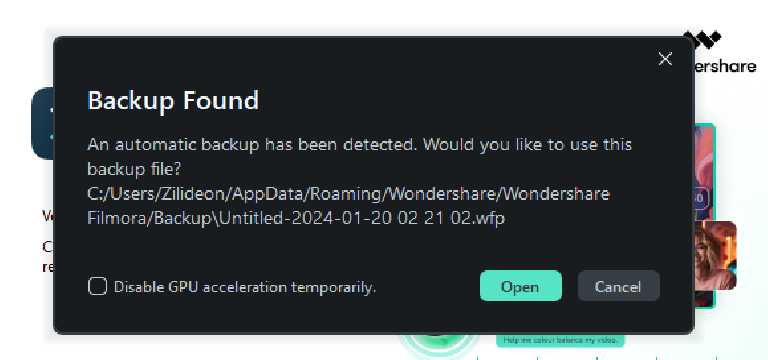
Filmora includes an automatic recovery feature that attempts to restore your project when the software is relaunched after a crash. If prompted, allow Filmora to recover your project.
2. Check Backup Settings
Filmora automatically backs up your project every 5 minutes by default but this setting can be customized in the “Preferences” tab to suit your editing habits.
Another big feature to help users deal with crashes in Filmora is backup settings. At times you may forget to save your work or there may be an abrupt power outage which will cut you off without saving your project.
Ensure that the backup feature is enabled and set to a frequency that aligns with your editing habits. This can minimize the loss of unsaved changes in the event of a crash.
How to Adjust Backup Settings
By default, Filmora has enabled the backup settings but you should check to be sure if the setting is turned on. If it is not you can enable it.
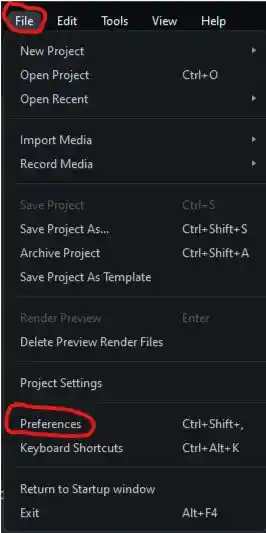
1. Go to the “File” menu and select “Preferences.”
2. In the “Folders” tab, find the “Backup Settings” section and toggle the “Back up my project every” key on if it’s not turned on already.
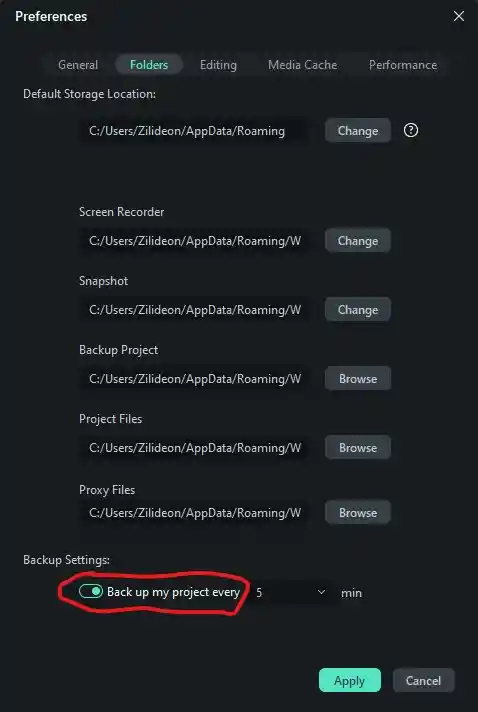
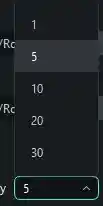
3. Select your preferred number of minutes from the dropdown menu. You can select 1 through 30. By default, Filmora set the backup time to every 5 minutes. Adjust the frequency as needed.
4. Click “Apply”.

If the toggle key is on the right side then it is already on. To turn it off, toggle it to the left side.
3. Locate Backup Files
Filmora automatically creates backup or auto-save files during the editing process. You can find these files in the designated backup folder.
Setting Backup Folder
1. Go to the “File” menu and select “Preferences” or press Ctrl+Shift+,
2. In the “Folders” tab, find the “Backup Project” section.

3. Click on “Browse” to select the folder you want your backup files to be stored.
4. Click “Apply” to save the setting.
Wondershare Filmora already stores these files in the “Backup” folder located in the application’s installation directory.
You should leave this setting so unless you have a good reason to change it.
How to Locate Backup Files in Filmora
1. Navigate to the “File” menu after launching Filmora or press Ctrl+O on Windows.
2. Select “Open Project”.

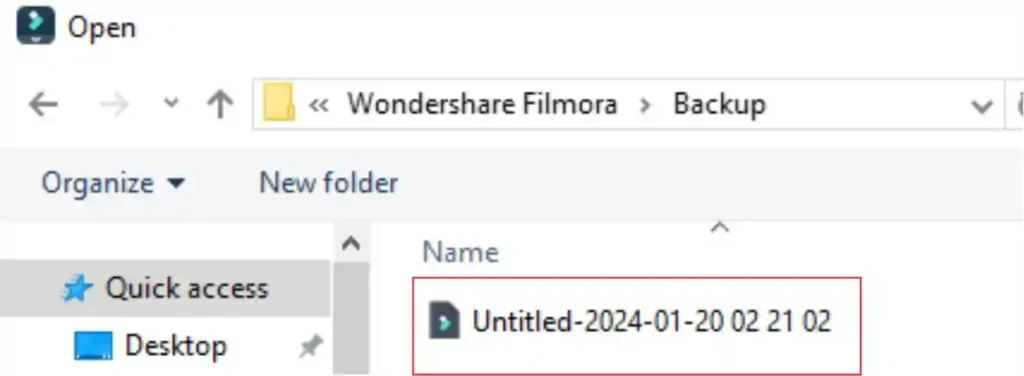
3. Locate the “Backup” folder and select it.

4. Click “Open” in the window to open the folder or double-click the folder.

5. Look for the most recent backup file or auto-save file and open it to recover your project.
4. Manually Save Incrementally
Embarking on a creative journey with Wondershare Filmora involves weaving stories, crafting visuals, and investing time and effort into your projects.
To safeguard your hard work and prevent potential frustration, it’s paramount to embrace the habit of regularly saving your projects.
Regularly save your project manually by pressing Ctrl+S (Windows) or Command+S (Mac). This creates incremental saves, allowing you to revert to previous versions if needed.
Cultivate the habit of manually saving your project frequently.
Proactive Measures to Enhance Stability
1. System Requirements Check
Confirm that your computer meets or exceeds the recommended system requirements for Filmora. Inadequate hardware may contribute to crashes and performance issues.
Upgrade your hardware to meet the requirements. If your system cannot be upgraded, look for video editing software that is compatible with your computer.
You can also buy a new desktop using the method I discussed in my previous article how I started my graphic design business if you are on a tight budget.
2. Keep Filmora Updated
Regularly check for updates and ensure that you are using the latest version of Filmora. Updates often include bug fixes and improvements that enhance software stability.
3. Graphics Drivers Update
Ensure that your graphics card drivers are up to date. Outdated drivers can lead to compatibility issues and contribute to software crashes.
4. Reinstall Filmora
If crashes persist, consider reinstalling Filmora. This can resolve issues related to corrupted installation files or conflicting software.
5. Use Reliable Media Files
Ensure that the media files you import into Filmora are not corrupted or in a format that may cause compatibility issues.
Using reliable and compatible media can contribute to software stability.
You should also import media files in bits so that the software and your system can handle the transfer.
In addition to that, transfer your files from the USB stick, external hard drive, or camera to the computer before you upload.
6. Backup External Media
Working with external media files is nothing new to video editors. This helps you save lots of space on your computer to avoid your computer slowing down or experiencing frequent crashes.
If your project involves external media files, ensure that you have backups of those files. Changes in file locations or accidental deletions can disrupt your project if the external media is not available.
7. Consider Cloud Storage
Filmora offers “Creative Cloud” which helps video editors store their projects on their cloud server.
Consider using cloud storage services to create additional backups for your projects. Storing project files in the cloud provides extra protection against hardware failures or unexpected events.
Go to the “Transfer Center” in Filmora to turn on “syn”. This will allow local data to be automatically synchronized to the Filmora cloud.
In addition, the data will be synced to the devices that you have added to the “Creative Cloud” for more convenient working.
8. Disable Plugins
If you have third-party plugins or effects installed, disable them temporarily to check if they are causing the crashes. Some plugins may not be fully compatible with certain Filmora versions.
9. Submit Crash Reports
If Filmora prompts you to submit crash reports after a crash, consider submitting them. This information helps the developers identify and address specific issues that may be causing crashes.
Setting Automatic Updates for Filmora

1. Go to the “File” menu and select “Preferences”
2. In the “General” tab, find the “Miscellaneous” section.
3. Under “Check for updates automatically:” drop down the menu and select how often you would like your software to check for updates automatically.
4. You can select “Every Day” or “Every Week” and then click “Apply” to apply the setting.
Filmora has already set this to Every Week.
How to Check for Filmora Updates
Go to the “Help” menu and select “Check for Updates.” Follow the prompts to download and install any available updates.
How to Update Graphics Drivers to Prevent Filmora Crash
Method 1
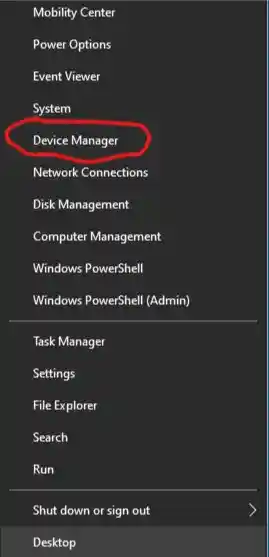
1. Right-click the Windows button.

2. From the menu displayed, select “Device Manager”.
3. Click “Display adapters” and right-click your graphics card.

4. Click “Update driver”.

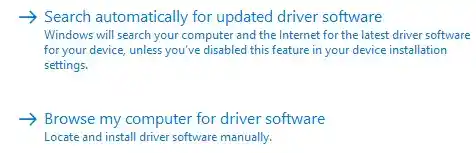
5. Next, select Search automatically for updated driver software. Or, select Browse my computer for driver software to choose a driver that you’ve already downloaded.
I recommend the first step as your device will search the internet and find the best driver for your computer.
Method 2
1. Visit the official website of your graphics card manufacturer (e.g., NVIDIA, AMD, or Intel) and download the latest drivers.
The Significance of Regular Saving
1. Mitigating Data Loss
Video editing is a meticulous process, and unforeseen issues like power outages, software crashes, or accidental closures can lead to data loss.
Regularly saving your projects minimizes the risk of losing substantial progress.
2. Preserving Iterations
Creative projects often undergo numerous iterations. By saving your work regularly, you create a timeline of progress, allowing you to revisit or revert to specific stages if needed.
This iterative preservation is valuable for refining your edits.
3. Efficiency and Focus
Establishing a habit of saving your projects at strategic points ensures that you can maintain focus on the creative aspects of editing.
Instead of worrying about potential data loss, you can immerse yourself in the editing process with confidence.
Conclusion
By implementing these recovery and proactive measures, you can navigate through software crashes in Filmora with confidence. Remember to save your work regularly, keep the software and drivers updated, and explore the available features to recover your projects in the event of unexpected interruptions.


Hello my loved one I want to say that this post is amazing great written and include almost all significant infos I would like to look extra posts like this
Hi Jessy, thank you!
What i dont understood is in reality how youre now not really a lot more smartlyfavored than you might be now Youre very intelligent You understand therefore significantly in terms of this topic produced me personally believe it from a lot of numerous angles Its like women and men are not interested except it is one thing to accomplish with Woman gaga Your own stuffs outstanding Always care for it up